24
3.2 The U-net Model
task ,we should look at the depth of we are trying to do ;for
image to image translation we need to conserve the important feature of the
image and use them to create a representation of that image in the target
domain, the bottle- neck of the U-Net can be seen as a simple representation of
all the image features we extracted using the down-sampling layers, we use
those exact features to build our target image through the up-sampling
layers.
3.2.2 The Markovian Discriminator
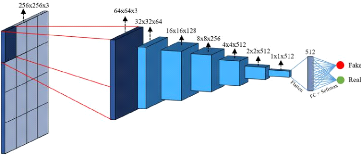
The Markovian discriminator 3.3 also known as a Patch
discriminator, a discriminator in a U-Net model takes an the generator paired
with the expected image,but different from a regular discriminator classifies
patches of the image instead of the entire image.
... We design a discriminator architecture -wich we term a
Patch GAN - that only penalizes structure at the scale of patches.This
discriminator tries to classify if each N * N patch in a
image is real or fake.We run this discriminator convolutionally across the
image ,averaging all responses to provide the ultimate output of D
-Image-to-image translation with conditional adversarial
networks- [9]


Figure 3.3: Markovian discriminator / Source
[1]
ï Note In the original paper [9]
,Philip Isola et al used a patch of 70 * 70,after proving superior
performance.
3.2.3 The Model Loss Function
the U-Net uses a combination of the regular adversarial loss
and a L1 loss that describe the difference between the generated and the
expected image using the absolute mean euror ,in the original paper [9] they
used a À = 100 :
loss = adversarialloss + À *
L1 (3.2)
25
3.3 Conclusion
· Note The choice of ë =
100 can be seen as a representation of how likely it is to generate any
image in the target image compared to generating the exact image we
want.
3.3 Conclusion
This chapter was an explanation of the architecture we are
gonna use in this project ,U-Net is a complex architecture that uses the
concepts we explained in the previous chapters, gaining an understanding about
those will help to further understand the code ;next chapter will be a
documentation of the project implementation
4
Project Implementation

h Tooling
h UML conception
h The Maps Dataset
h Generator Implementation
h Discriminator Implementation
Introduction
h Pix2Pix Implementation h Model Training h
Model Evaluation h Conclusion
4.1 Tooling
In the scope of this project we used a couple tools in both
the conception and the implementation ,next we will go into a brief explanation
of each tool and what we used it for:
Python: Python is a high-level, interpreted, general-purpose
programming language. the design philosophy of python emphasizes code
readability with the use of significant indentation.python supports multiple
programming paradigms, including structured (particularly procedural),
object-oriented and functional programming.
4.2 Conception

Figure 4.1: python logo / Source[27]
Keras:Keras 4.2 is an open source library that gives a Python's
interface of Artificial Neural Networks ,Keras can be seen as an interface for
TensorFlow library.

27
Figure 4.2: keras logo / Source[11]
Tensorfiow: TensorFlow 4.3 is an open-source software library
for machine learning and artificial intelligence. It can be used across a range
of tasks but it particularly focus on training deep neural networks.
Tkinter 4.4 :tkinter is a way in Python to create Graphical
User interfaces (GUIs),tkinter is included in all standard Python
Distributions. This Python framework provides an interface to the Tk toolkit
and works as a thin object-oriented layer on top of Tk. The Tk toolkit is a
cross-platform collection of `graphical control elements' for building
application interfaces.7
28
| 


